I’ve been freelancing for a few years and working with many people, who need to bring their brilliant idea of iOS app to life. Unfortunately, not all of them know how to organize things and do a good project management. This knowledge is very useful for iOS project of any size, it saves your time, your nerves and your money.
In this article I’d like to point few common mistakes and give a few tips how to do better.
Define a functional specification
The functional specification is a kind of guideline and continuing reference point as the developers write the programming code. In my opinion the functional specification is essential for every mobile development project. It’s actually pretty easy to create this document: you just extend the project’s summary and describe what the mobile app should do and how the users should interact with it. So the main goal of the functional specification is to describe the project in a detailed manner. Defining the functional specification would require some time from your side, but the result worths your effort.
Keep in mind that functional specs don’t have to be strict. They may change during the development process and it’s fine.
Here’s a good example of functional specification. This is actually a mobile version of Joel Spolsky’s example.
Create an app prototype

Prototyping is a great way to present your idea visually to the developer. It’s much easier to look at a layout rather than reading a text describing how the controls should be laid out. The prototype helps with the following:
- Helps to plan a features/functionality the app need.
- Helps to understand the user’s behaviour within the app.
- Helps to understand relations between the screens.
- Helps the developer to get a better understanding how the app should behave and how it should look like.
You don’t have to create the mockups in Photoshop or Sketch. There are good tools doing this, such as InVision or Marvel. Both of them have free plans. They also able to navigate through screens in an interactive way.
Please note that the prototype doesn’t need to look exactly like the finished app. It’s more like a set of mockups/sketches.
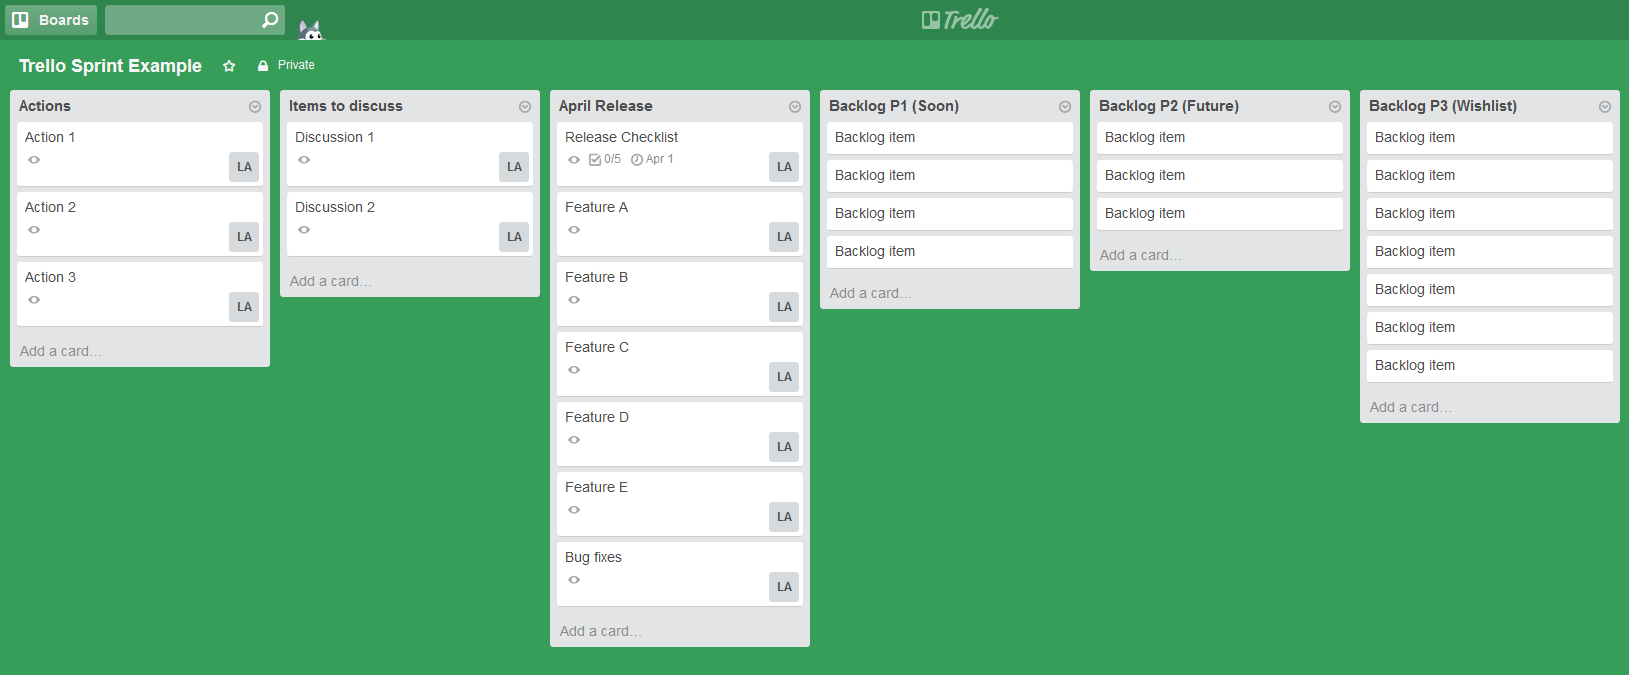
Use online task managers
Such as Trello, Evernote or Wunderlist. Many of my clients think that emails and Skype are a good fit for project management and assigning/tracking tasks. Well, that’s not true. Tasks and issues can easily be lost among other conversations. Furthermore, if you communicate via voice calls, this problem becomes a nightmare. On the other hand, task managers let you to define a priorities and easily track the progress of assigned tasks. Task managers are good for developers too, as they help to plan the workload and can be used as issue trackers.
Examaple of usage:
Use version control system
First of all, as the project owner, you want to have an access to the project’s source code, because this is actually a thing the developer is working on. The app’s executable files can be easily compiled from the source code, but they can’t be converted back to the source code.
Version control is a system that records changes to set of files over time, so that the developer can recall specific versions later. It allows to revert files back to a previous state, revert the entire project back to a previous state, compare changes over time, see who last modified something that might be causing a problem, who introduced an issue and when, and more. Using a VCS also generally means that if the developer screw things up or lose files, he can easily recover.
Also, if you’d like to switch to another developer in the future, it would be easier for a new developer to dive into the project if it’s managed by a version-control system. In this case a new developer would be able to look how the previous developer was developing the project.
All expert developers are familiar with version control systems, so you don’t have to dig deep into this. You just want to set up a shared repository for the project, so the developer could push his changes to it on a regular basis. The simplest option for you is to create a free account at Bitbucket, create a private repo for the project and share it with the developer. Very easy and safe. Here’s a step-by-step tutorial how to create a new repo at Bitbucket:
- Sign up at https://bitbucket.org/.
- Go to Repositories -> Create repository.
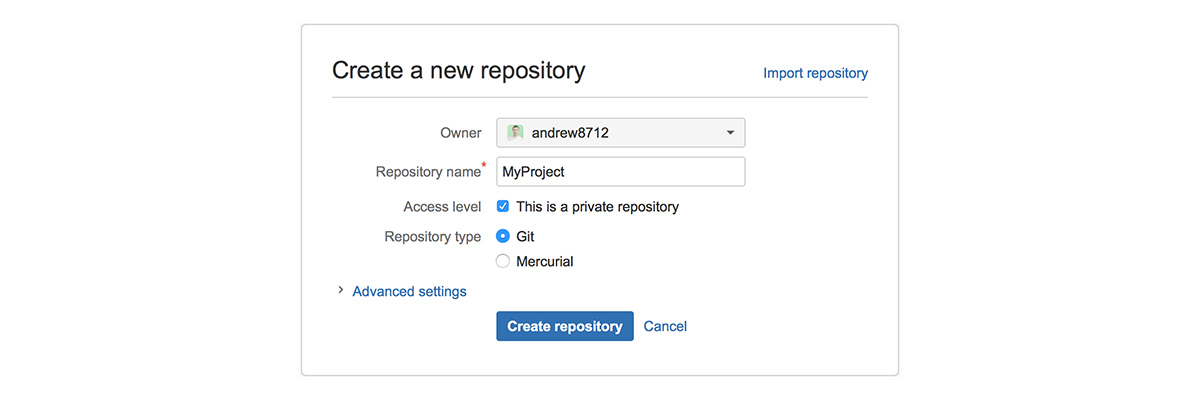
- Enter repository’s name without spaces and press Create repository. The repository is created. Now you want to share it with the developer.
- Open the repository.
- Go to Settings -> Access management.
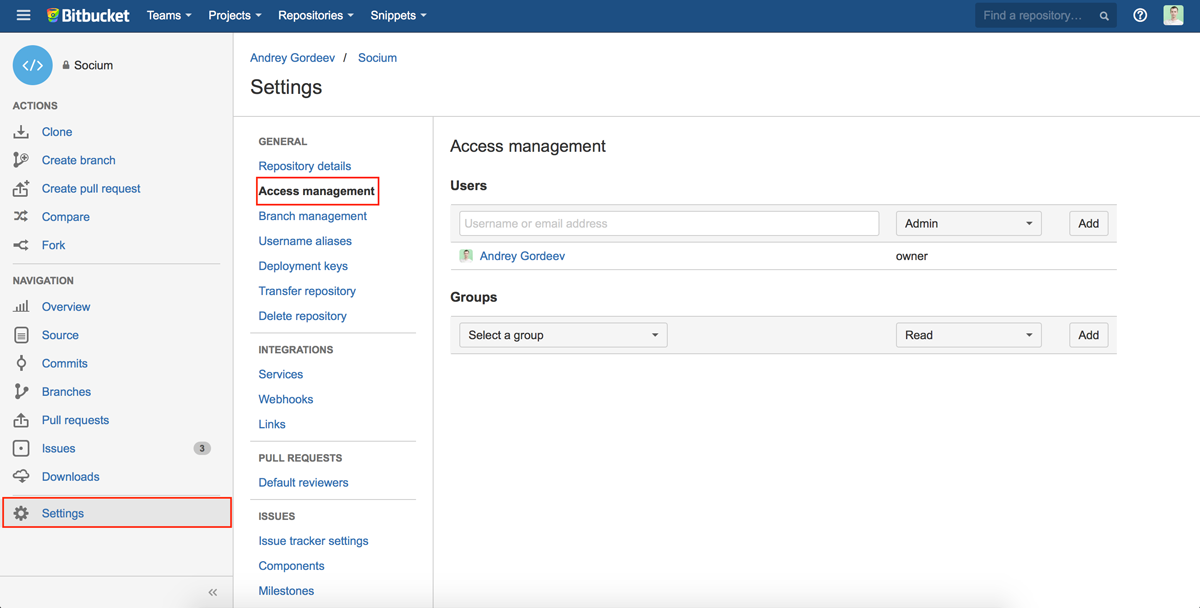
- Enter the developer’s email below Users label.
- Change user’s permission from Read to Admin

- Press Add. That’s it, the developer will receive an invitation to his email address!
If you want to download the source code onto your computer, go to Downloads and press Download repository button.
Following these tips will help you to build an environment for efficient app development.